BELAJAR MEMBACA

http://rajinbelajar17.blogspot.co.id/

Jumat, 23 Desember 2016

Cara membuat Foto Efek Lukisan di CorelDarw Terbaru

kembali lagi kita pada tutorial CorelDraw yang sangat kita sayangi.. heheh. dalam kesempatan ini kita akan mempelajari beberapa effek yang dimiliki oleh corelDraw untuk mengolah foto menjadi menarik dengan beberapa efek yang kita gunakan.

efek yang kita gunakan dalam tutorial ini adalah efek WaterColor dimana efek ini bisa kita gunakan untuk merubah gambar atau foto sepeti efek lukisan dinding yang tentuya sudah sering kita jumpai di rumah-rumah kita


Tutorial COrelDraw ini berhasil kami kutip dari sebuah situs belajar desain CorelDraw Indonesia yaitu BelajarCorelDraw.co, saya ucapkan banyak terima kasih kepada admin yang sudah membagi kemampuan dan pengetahuanya tentang desain CorelDraw, Jujur saya banyak belajar desain corelDraw dari Beliau.

https://blogger.googleusercontent.com/img/b/R29vZ2xl/AVvXsEj5UTMjKaP2pQxsmpvwPvhPQoF0Qabrp5q2Bk4fExPSsgzlqtMHaImhoCkQwHlJ2txrzDCGUlNNjZTTtNbStg5wslinm4_uHhQAE9rirLz_ESE8gfDJpzqbyUSn7lA0L3gpaHJH6f-tWgE/s1600/Iwan-Fals1.jpg


sekarang mari kita mulai untuk tutorial membuat foto menjadi luksisan dengan corelDraw.

1. Buka CorelDraw terserah versi berapa saja. namun disini saya menggunakan CorelDraw x7.

2. Buat sebuah lembar kerja baru dengan tekan CTRL+N atau bia klik icon New Docummen.

3. masukkan foto atau gambar yang ingin dirubah bentuknya menjadi efek lukisan.

4. dalam tutorial ini menggunakan gambar naga bersayap, yang menurut legenda naga ini pernah hidup di dunia.

5. Langakah yang harus anda lakukan sekarang adalah dengan masuk ke Menu Bar --> Bitmaps --> Art Strokes --> Watercolor... seperti gambar di bawah ini.


6. jika sudah anda klik maka akan muncul sebuah jendela baru dan lakukan settingan sebagi berikut.

7.Mungkin di tempat kamu masih perlu dirubah untuk settingannya menyesuaikan gambar atau Foto yang kamu miliki.

Jika anda berhasil maka anda akan mnedapati sebuah gambar dengan efek lukisan.


Jumat, 16 Desember 2016

Cara Membuat Sertifikat Kegiatan Seminar Dengan CorelDraw

Tutorial yang kita bahas masih seputar dunia desain CorelDraw. Walaupun kemarin saya sempet membuat sebuah tutorial Photoshop namun sejatinya blog ini akan lebih banyak membahas tentang Tutorial Desain CorelDraw.

Untuk kamu yang baru pertama kali menemukan Blog "GURUCOREL" maka saya ucapkan selamat datang, dan selamat juga hari ini anda menjadi salah satu dari seribu orang yang berhasil menemukan tutorial yagn sederhana ini.

Sertifikat... Jika ada seseorang yang berbicara tentang sertifikat maka pikiran kita tidak akan jauh-jauh mencari apa maksudnya itu, karena sertifikat itu sudah pasti identik dengan sebuah kegiatan sehingga banyak orang yang berlomba-lomba membuat desain Sertifikat, Seperti : Sertifikat kealian, sertifikat kegiatan, sertifikat keahlian, Sertifikat kelulusan dan masih banyak lagi jenis-jenis sertifikat.

namun semua itu bisa kita kerjakan hanya dengan CorelDRA. Pada intinya semua desain sertifikat itu sama, ada Header, nama kegiatan, Tanggal, Lokasi, No Surat dan juga pihak-pihak yang bertanda tangan sebagi orang yang bertanggung jawab atas kegiatan tersebut.ut 

oke kita mulai saja untuk tutorial CorelDraw ini,

Nama : Tutorial Membuat Sertifikat Seminar 
Software : CorelDraw X7. (masih bisa di x3 x4 x5 x6 x7)
Lama pengerjaan :10-20 Menit.


1. Buka COrelDraw kesayangan anda dan buat sebuah lembar kerja baru dengan menekan CTRL+N (New Documen). anda bisa lihat pada gambar berikut ini.
2. Masuk tahap selanjutnya adalah memebuat sebua persegi panjang seseuai dengan ukuran sertifikat yang akan kita buat, disini saya menggunakan ukuran A4 secara lanscape dengan meggunakan Rectangle (F6).

3. untuk membuat Header saya menggungakan Segi Tiga yang saya dapatkan di Polygone tool kemudian saya susun seperti gambar berikut ini.


BERSAMBUNG... :)
cara membuat sertifikat dengan coreldraw x7 coreldraw x4
cara membuat desain sertifikat dengan coreldraw
cara membuat sertifikat dengan coreldraw x6

Selasa, 13 Desember 2016

2 Easy Ways to Open and Edit File 'AI' 'PDF' 'PSD' 'EPS' In Corel Draw

2 Easy Ways to Unlock and Edit File 'AI' 'PDF' 'PSD' 'EPS' In Corel Draw 

Being a designer who is just learning this tutorial sanagt suitable for you, because sometimes we get a file format ber "AI" This format is the work of Adobe Illustator ie close friend Corel Draw (Or they mushuhan: D). These two applications are equally serve to make the Vector File. of course you already know from which company both files. well now you you are loyal users of Corel Draw, but once you get the file extension "AI". How do I edit the file in Corel Draw. Well this was prayer ... (Si Udin Mayor: D) Eh point Here's how: How to Drag And Drop 1. prepare corel draw you have, here I am using CorelDraw x7, ya lah keep pace with the times, let me present ..


2. From the above picture can I explain that no one is fil-format "AI" is still in Explore, then left click and hold MOUSE - then drag and drop worksheet CorelDraw or Drop.

3. If a picture above reveals that it means you do not have some type font in your AI file.


not be a problem immediately wrote skip this step and click Ok. to Fontnnya day you can edit at will according to need.
---------------------------------------------------------------


How to File Import (CTRL + I)


1. In this way we utilize existing facilities in CorelDraw, CorelDraw fasiliata exists in all versions langakah you can do is as follows. click File Select Imports (CTRL + I) select the folder where you saved the file "AI" and click No. 4 "Import"


and now the file is formatted AI can already easily be edited in your Beloved CorelDraw.


Well that was the bit to open a file format that is not the extension CDR. You can also using this tutorial to unlock. PDF, Eps, PSD and other file formats. may be useful and you are happy. Do not Forget My Account Follow ya .. if Beneficial could in those distributed to your friends. Thanks.

2 Easy Ways to Open and Edit File 'AI' 'PDF' 'PSD' 'EPS' In Corel Draw

Tutorial 10 Minute Make Professional 3D Logo Using CorelDRAW X3 X4 X5 X6 X7 X8


welcome to come back in the tutorial latest CorelDraw of us wish you could enjoy tutoral this simple, simple though hopefully can provide benefits and new experience in the design CorelDraw. We make this tutorial just sharing, if less pleasing please comment on your comments and suggestions we wait, because your input is an encouragement for us to make a tutorial desan CorelDraw again. Information


Tema : Logo 3d Profesional
Software : CorelDarw 11 12 x3 x4 x5 x6 x7 x8 x9
Time: 10 minutes
Location: where there are no plugs: D


This tutorial before continuing to let us see the results of a 10 Minute Make Professional 3D Logo Tutorial 12 CorelDRAW X3 X4 X5 X6 X7 X8


Step 1
create a new document in your favorite CorelDRAW, with press CTRL + N, it is up to the size of the paper how langakah 2 Create a circle using the sebauh Ellips Tool thereby forming like this


Step 3
then give a color effect like this, I am here using effects Interactive Fill Tool as I pointNo. 1 in the figure below, then I switch No. 2 up No. 3 and I set the coloring in lingkaranya


Langakah 4 
next stage I make as much as 3 Lingkran lingakran again, then I put together to be like in the picture below, 


Step 5
further incorporating these three circles into the field using a Whole Well as I Refer to this dibwah red arrow.


Langakah 5
Continues at step selanjtnya, Circle merged we will use menajadi cutting tools enabling a large circle with Back Minus Front and the results are as shown below


Step 6
not be allowed to miss for langah 6 is create a circle again kemudaij are colored white, a case in this picture


Step 7
there are stages to seven so we continued to give a transparent effect on a white circle we just created, by using the Transparency Tool 


Step 8 
create another circle by pressing CTRL so that the circle was really round, and then give the red color. kemdian send images to the rear by pressing CTRL + PgDown.


Step 9
follow the arrows that I appoint the following gamber, I provide coloring effects by usingthe Fill Tool.


10 steps
to create a glow effect sebauh, here we create another circle sebauh kemudan me give white. 


Step 11
In this step I gave Transparent effect on lingakaran which we have created. kemdua set a suitable position according pencahyaan that as we wanted


Step 12
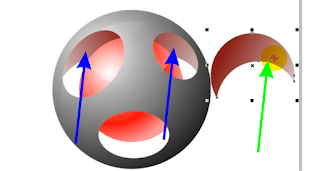
to make a darker effect in lingaran here I make a crescent that I gave in red with white tip, then arranged to position the blue arrow.

and the results are as follows

Thank you for visiting tutorial Tutorial 10 Minute Make Professional 3D Logo Using CorelDRAW X3 X4 X5 X6 X7 X8 may be useful greetings designs greeting outstanding.

How To Make FACEBOOK Logo In CorelDraw

welcome friends CorelDraw design, already two days I speckle post CorelDraw tutorial again We understandably so .. yesterday it was the duty of a friend so ngak sempet create designs again. thanks for loyal :) CorelDraw is the software-based design Vectorwhere Corel it is intended to make an image that initially no be no, yes more or less as it is, in my experience CorelDraw it is very easy to use, ranging from a worksheet that has a diameter wide, so we can be pleased today to create the design.

This evening we will discuss  Tutorial Corel Draw Recent Make Social Media Facebook Logo why I took the theme of social media? 

The reason was to create a logo sebuh social media has a different look than other social media ..: D

rather than talk at length and does not connect yuk we see tutorial on this one

Corel Draw Tutorial Recent Make Social Media Logo Facebook

software : Corel Draw x3 x4 x5 x6 x7 x8
Time: + - 10 minutes
Theme: Social Media Logo Youtube

as a result of this tutorial is as berikit

1. Like the previous tutorials of course you must open a new worksheet and create a document with a size of A4,

2. The second step is you have to make a circle, the circle serves to put the logo up later,
enable Elipse Tool then press CTRL  and drag the cursor to create sebuat circles really round. you can see in the picture below.

in the same way to recreate a lingaran that size is much smaller and put it inside the big circle, you can see in the picture below.


3. in this section we enter staining, most large circle Enable then click Fountain Fill and will appear as a layer below, follow peawrnaan appropriate way in the following figure.    

The results are as follows


4. then in the same way now enable much lbih small circle and you can follow the staining as follows

if you've done setiingan colors as described above, you will find the following color

5. Now enter the coloring at the smallest circle here we are still using the  Fountain Fill and follow these steps

then you will find the smallest circle color as follows


6. langah to 6 we will make a circle premises effects Transparency Redraw a denan lingakaran Elipse tool as follows. circle-shaped bit stretched, so you do not have to pressCTRL  again

Circles that have been made later put on 3 lingaran that we paint the above, then give the white color. you can see in the picture below

7. The next rare enable Trasnsparancy Tool      then click on lingaran white and pull up, then the picture will be transparency.

make a chart 

in this phase we will be more use Bezier Tool    how to use it is to draw a line and we had to bring the end of the start line to start again supa end of the field that we make we can paint

8. Bezier Tool to create a field as shown below


9. then with the Shape Tool make the field into a curved lines with a pointed end. So that the line can be made into a turn you must enable the Convert Line Curve

And the results of our work adalalah image as shown above.

10. in this phase we will enter the stage of re-staining is using Fountain Fill doing color settings as shown below  

and the results of our work are as follows CorelDraw

11. Still using Beizer Tool Create a line again as follows
12. The line beut then be turned and paint the lines. until it looks like as I gave the red arrows.


13. unite garafis field we've created the first lingaran that we created earlier and the results are as follows

Make effect is Naga


`14. Still make use Bezier Tool Draw a curve like the following pattern

15. to activate the Shape Tool and Convert Line To Curve we will make the lines become tapered and curved
the result is as shown above.

16. sekarnag create a foot on the dragon
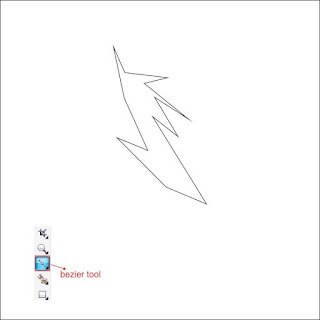
17. The line set with the Shape Tool and Convert Line To Curve, and we can see the results as follows

18. teresbut foot united with the body of the dragon that we have made 
Enable both fields then click the Weld      and the result will be as follows

19. create a field again, in the same way as we have already discussed diaatas, so here I will not discuss in detail again.

 Then put it right in the palm of a dragon.
20. enter the part again with settinga color staining as follows

and the results can be obtained as shown below

section pattern that we created in the head you can paint it with different colors namelyDark gold.
21. The final stage is to combine the pattern that we have made so that it becomes as shown below.

Thanks for dropping by at this simple tutorial CorelDRAW, may be useful, if there are constraints on the menu seilahkan ask kommen
regards design
regards outstanding
Also Read
  •  10 min Makes Logo TWITTER
  •  10 min Makes Logo BLOGGER
  •  10 min Makes Logo FEED