welcome to come back in the tutorial latest CorelDraw of us wish you could enjoy tutoral this simple, simple though hopefully can provide benefits and new experience in the design CorelDraw. We make this tutorial just sharing, if less pleasing please comment on your comments and suggestions we wait, because your input is an encouragement for us to make a tutorial desan CorelDraw again. Information
Tema : Logo 3d Profesional
Software : CorelDarw 11 12 x3 x4 x5 x6 x7 x8 x9
Time: 10 minutes
Location: where there are no plugs: D
This tutorial before continuing to let us see the results of a 10 Minute Make Professional 3D Logo Tutorial 12 CorelDRAW X3 X4 X5 X6 X7 X8
Step 1
create a new document in your favorite CorelDRAW, with press CTRL + N, it is up to the size of the paper how langakah 2 Create a circle using the sebauh Ellips Tool thereby forming like this
Step 3
then give a color effect like this, I am here using effects Interactive Fill Tool as I pointNo. 1 in the figure below, then I switch No. 2 up No. 3 and I set the coloring in lingkaranya
Langakah 4
next stage I make as much as 3 Lingkran lingakran again, then I put together to be like in the picture below,
Step 5
further incorporating these three circles into the field using a Whole Well as I Refer to this dibwah red arrow.
Langakah 5
Continues at step selanjtnya, Circle merged we will use menajadi cutting tools enabling a large circle with Back Minus Front and the results are as shown below
Step 6
not be allowed to miss for langah 6 is create a circle again kemudaij are colored white, a case in this picture
Step 7
there are stages to seven so we continued to give a transparent effect on a white circle we just created, by using the Transparency Tool
Step 8
create another circle by pressing CTRL so that the circle was really round, and then give the red color. kemdian send images to the rear by pressing CTRL + PgDown.
Step 9
follow the arrows that I appoint the following gamber, I provide coloring effects by usingthe Fill Tool.
10 steps
to create a glow effect sebauh, here we create another circle sebauh kemudan me give white.
Step 11
In this step I gave Transparent effect on lingakaran which we have created. kemdua set a suitable position according pencahyaan that as we wanted
Step 12
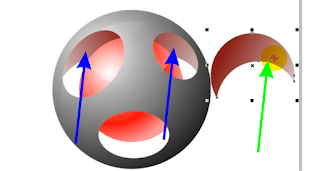
to make a darker effect in lingaran here I make a crescent that I gave in red with white tip, then arranged to position the blue arrow.
and the results are as follows
Thank you for visiting tutorial Tutorial 10 Minute Make Professional 3D Logo Using CorelDRAW X3 X4 X5 X6 X7 X8 may be useful greetings designs greeting outstanding.


Tidak ada komentar:
Posting Komentar